To mangle a quote – “The new NSTAR is here, the new NSTAR is here, the new NSTAR is here!”
For those of you who are not cross wired like me – Steve Martin classic bit here on Youtube
NSTAR (aka – national grid or something) came on Friday and installed the electrical power hook. Woo-Hoo!
-

- The electrical splice and transformer (which hums by the way). It is very large, about 4 foot per side
-

- 00000 Kilo Watt Hours consumed – it won’t stay that way for long
Paul’s team has been busy roughing in the drywall as well. I think the contrasts between the glass, the mahogany window trim and white walls will work really well
-

- Drywall “rough-in” is almost complete. Texture and color contrast for the win!
-
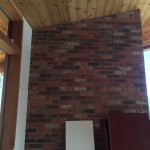
- I think the natural mahogany trim, white walls and the brick will look great
-

- Natural light via skylights in each bathroom. This is the guest bath with the integrated shower/tub system
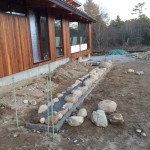
Also – the mason’s are working this weekend – presumably because it is still warm (50’s) and it is easier to work with the mortar this way. The entry to the house is via a ramp up from the carport area leading to the front door and then a patio area. The patio area / ramp will be about 6 feet wide and be flagged in blue stone. There will a low stone wall, capped in blue stone around the edge that will also work as seating in the sunshine.
-
- Laying out the foundation for the stone entry ramp and patio. The area will be surrounded by a low stone wall, capped by blue stone flags. It should be low enough for acting as a bench to sit on. The mason and Paul, based on their experience with metal roofs, snow & ice sliding off the same etc… think the spacing is about right
-
- The initial course of rock for the ramp wall
And a couple of photos relating to the kitchen. As I have noted in other construction and design posts, the center island will be a design feature and the main dining area. The island will be at a normal table height, to allow regular dining room chairs instead of bar stools. To get the under the table knee area, we are going to steal another idea from the Atomic Ranch books and use something I saw there – an aluminum I-Beam to cantilever support the counter top. To help the machinists interpret my poor drawing, I hacked together a wooden model out of some plywood on Saturday. Note, because the only wood I had was a bit warped, things are not very square and they don’t fit together too well – but it gives you the basic idea. See below

A model of the aluminum I-Beam structure for the island. Not to scale, even with itself, as the only material I had easily to hand yesterday was some luan plywood that had been covering up sliding window that got broken last winter when ice rammed through it. The plywood was not very flat.
Basically the idea is that the box in the back represents the casework cabinetry from the factory in New Hampshire. The I-Beam will sit on top of a box built onsite and lie flat to the back of the cabinet. The counter top will lie flat across the I-Beam and the cabinets -with the I-Beam projecting several feet in order to provide cantilevered support for the countertop
Finally, I stopped by Carlisle Artisan’s to pick up some gifts and found these bowls – they looked great and fit with the whole mid-century theme of my house

Two bowls I picked up for my new island countertop from Carlisle Artisans